M13 Processing advice request
M13 Processing advice request
Hi again guys,
After my last post requesting some processing help on M51, I thought I would ask for a bit of help with processing of M13. I have followed the process gboulton went through probably 10-15 times, trying to understand what each amendment is making to the image and it's been such a huge help. The initial autodevelop and wipe that Startools gives me is a million times better than anything I could ever do in PS - it's a huge help.
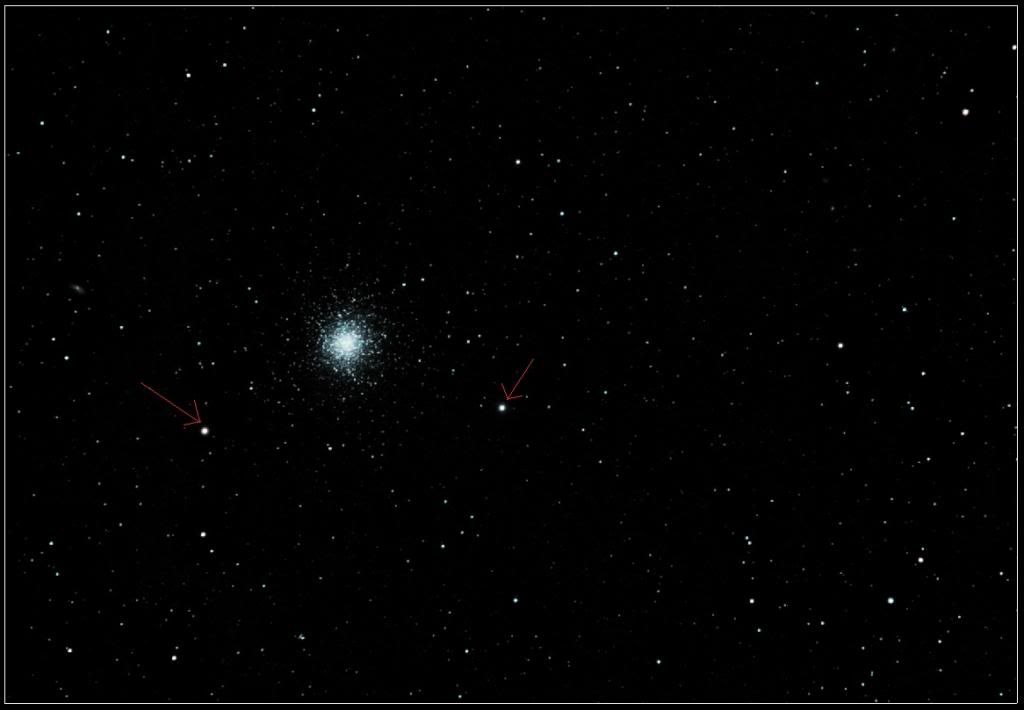
So with the new processing of M13, I'm still struggling a little to get the background noise totally under control. Also the stars in the image I've pointed to are pretty pixelated. I've ran through a few different processes to see if I can do any better and am struggling to do any better.
If anyone can offer any advice or is happy to have a go and upload the process it would help. I really don't want to give off the impression that I don't want to learn for myself by asking someone else. It's just without a manual or anyone to talk me through it, following someone's steps and learning why they did what seems the best way to learn your way around the software quickly.
The best I managed to get is here -
The TIF is here - http://dropcanvas.com/#FqQPYp87Il8604
Thanks again to anyone who finds time to reply.
Another quick question I had was when I turn off tracking and do the final noise reduction, adjustments of the different scales brings about no apparent change to the image that I can see. What should I be looking out for here? Am I missing something?
Re: M13 Processing advice request
Hi,
Much of the standard workflow applies here.
I came up with the following;
I opened the file and did the usual AutoDev to see what we have.
You can see that AutoDev in this case really helps pin-pointing some problems in the data; vignetting and dust donuts.
I did the usual crop, bin (to 71% in this case).
Next I applied Wipe to remove the gradient/lightpolluyion/vignetting. This is where you'll want to be mindful of the dost donuts we found - they are 'dark anomalies' that can confuse Wipe. You can either mask out the dust donut (use a lassoo in the mask editor) or, if the dust donut is small, bump up the 'Dark Anomaly Filter'.
Redoing AutoDev still picks up too much noise, so I resorted to a manual 'Develop'.
I applied a tiny bit of deconvolution (didn't do too much), while using the Decon mask preset.
Right before switching off tracking, I used the Color module to get the color balance right and get a nice neutral background in the process.
I also used the Life module's 'Heavy' preset and bumped up saturation - it gives a nice glow to clusters.
The Denoise module (which is about to be upgraded!) tends to find the noise quite well by itself, while leaving non-noise alone.
The scale parameters govern increasingly coarser noise (from fine to the bigger blotches). You should definitely notice the background become less noisy/grainy as you increase the scales.
The parameter that governs the overall strength of the effect is called 'Brightness Detail Loss' for the luminance component of the noise, while 'Color Detail Loss' governs color noise. If you set the latter parameters to 0%, you will be indicating that no detail loss may occur at all, therefore effectively turning off noise reduction. The higher you set these values however, the more leeway you give the Denoise module to start modifying pixels (resulting in a smoother image at the expense of potential detail loss).
Does this help?
You are totally right about this being the quickest way to learn; experiment and ask!
Ivo Jager
StarTools creator and astronomy enthusiast
StarTools creator and astronomy enthusiast
Re: M13 Processing advice request
Hi there,
Thanks so much for the reply. Yes it has helped a lot.
To be honest, I have spent the last two hours this evening testing and playing around and obviously cannot get to the same level as your image and am still having some issues, but it's progressing.
I intended tonight to type out a lengthy reply, detailing my processing and my questions along the way. I've done this now about 3 or 4 times but keep making incremental improvements myself.
I'm going to play with it for a few more days, see where I get and then put up a post with areas I need some more advice in.
Thanks again for taking the time. For someone with no photography background, learning something new like this is incredibly challenging so I appreciate the assistance.
Re: M13 Processing advice request
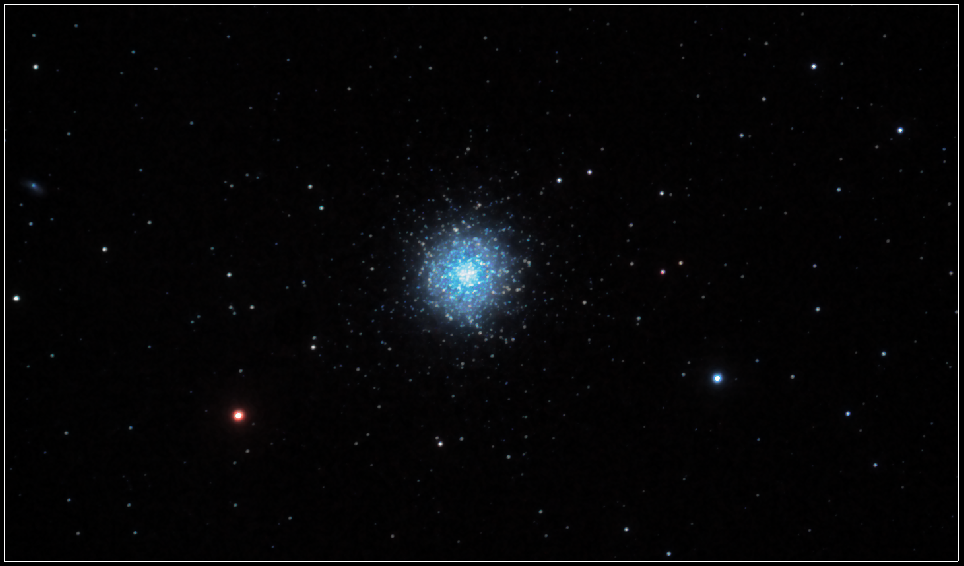
Thought I'd upload my best attempt tonight.
As you can see, I'm still struggling to keep those two stars under control. They are visibly pixelated . Overall I'm quite happy though. It's getting there.
Any advice on how to keep those two stars in check?
I'm also really struggling to control that blue from the centre of the image. Any advice on this would also be welcomed.
Re: M13 Processing advice request
Wow, that's some great progress!
I have to say 'm stoked for both you and StarTools that you are demonstrably getting to grips with the software so quickly.
I think I understand now what you mean by 'pixelated' stars - you are referring to noisiness around the stars?
There are a number of ways to address this.
One generically applicable technique is to simply perform some more localized noise reduction (after tracking has been switched off). Just put the offending areas in a mask and launch the De-noise module.
If you don't like the shape of the stars, try using the 'Repair' module.
Another way is to selectively blur the image using the Layer module, again, with a mask. Using the Brightness Mask Mode setting (and varying the Brightness Mask Power) in the Layer module, you can even specify to leave pixels intact depending on their brightness.
I'd say your color balance is going the right way, though you could probably pull back on the blue a little in the Color module by increasing red and a some green. You'll want to see some shades of red and yellow in that cluster, as well as the other stars in the field of vision.I'm also really struggling to control that blue from the centre of the image. Any advice on this would also be welcomed.
Contrary to other software, StarTools attempts to retain color in bright parts of images. As you stretch these parts, color is typically lost and those parts tend to become white/grey, but since StarTools' Tracking feature also keeps track of a pixel's true color, ST is able to restore it. It's very useful for cores of DSOs such as nebulas and (in this case) clusters.
If, however, you want to mimic the 'classic' look of a desaturated core, it can be done;
After switching Tracking off, launch the 'Layer' module.
Select 'Desaturate fg' for 'Layer Mode', which will desaturated the foreground layer.
Now we need to make sure that the brighter parts of the image appear desaturated, while the darker parts keep their saturation (kust like in that 'classic' look). For this we use a Brightness Mask; set 'Brightness mask Mode' to 'Where foreground is dark, use background'. You will now see that the composite smoothly blends between the black & white (foreground) and color (background) image, depending on a foreground pixel's brightness. You can control how the brightness mask response to pixel brightness behaves by using the 'Brightness Mask Power'.
This is all 'old-school' PhotoShop stuff really...
Hope this helps!
Ivo Jager
StarTools creator and astronomy enthusiast
StarTools creator and astronomy enthusiast
Re: M13 Processing advice request
Thanks again for another detailed reply.
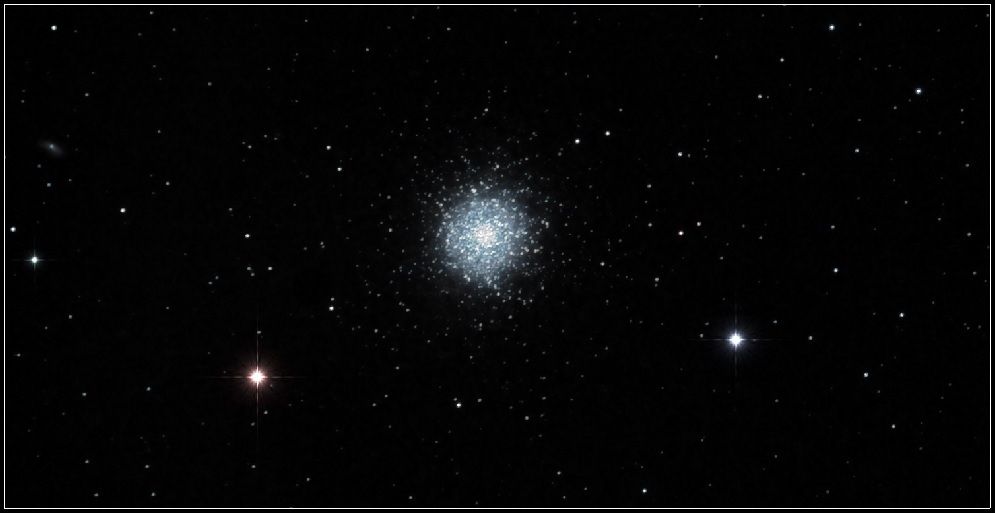
Had another crack at it again first thing this morning. I'm still really struggling with those two stars and cheated some diffraction spiked on top of them for now . I will keep plugging away at those two stars tonight.
I'm pleased with the cluster itself now though. I was struggling again to get the red in there. I'd love to know what color settings you used if you can remember.
Here it is again anyway. I'm singing the software's praises to people at the moment. You've been really helpful as well. Thanks.
Had another crack at it again first thing this morning. I'm still really struggling with those two stars and cheated some diffraction spiked on top of them for now
I'm pleased with the cluster itself now though. I was struggling again to get the red in there. I'd love to know what color settings you used if you can remember.
Here it is again anyway. I'm singing the software's praises to people at the moment. You've been really helpful as well. Thanks.
Re: M13 Processing advice request
I know some folks are "offended" or whatever about artificially adding diffraction spikes to stars...but I believe it can be a true enhancement if it's not overdone.
I think you absolutely nailed it here...that adds just the right touch to this image, imo, and handled a tricky issue with the stars themselves.

I think you absolutely nailed it here...that adds just the right touch to this image, imo, and handled a tricky issue with the stars themselves.
Re: M13 Processing advice request
Thanks for the positive comments!gboulton wrote:I know some folks are "offended" or whatever about artificially adding diffraction spikes to stars...but I believe it can be a true enhancement if it's not overdone.
I think you absolutely nailed it here...that adds just the right touch to this image, imo, and handled a tricky issue with the stars themselves.
Diffraction spikes are a pretty gorgeous effect. Whether or not they're added afterwards or there initially in a reflector is a strange thing for someone to become bothered about.
I agree, it did the job here for now. I would rather have the processing under control and will get there eventually, but i like the effect personally.
Thanks again.
Re: M13 Processing advice request
Nice!
For really convincing diffraction spikes, make sure to set small level of 'blur' that mimics the natural blur of your image. It'll make the diffraction spikes fit in with the rest of the image.
To really fool your audience, perhaps add them at a very slight angle, as they almost never are spot-on at a 0 degree angle.
Lastly, bestowing diffraction spikes on all the stars in your image will help them make even more natural.
Ivo Jager
StarTools creator and astronomy enthusiast
StarTools creator and astronomy enthusiast


