Newbie issues following M8 tutorial
I am trying to see whether StarTools is a good match for me, looking for something quick and easy for processing on a Mac. I am very new to astrophotography (ok, some film photos in the 90's are not near the same experience) and I don't have clear skies (in any way, both UK climate and in a city), so I can't really get the best of my Canon 550D on a Skywatcher 80ED - so post-processing should help as much as possible. I am trying out a stacked M42 photo which I try to process with various methods to see which I like to use best. StarTools seems promising (some modules seem to do a great job), but I get a bit inconsistent results trying to get a good workflow and repeat it. So I thought perhaps I should log it here and see if there are some obvious mistakes I am doing.
For reference, the stacked FITS image is here: https://www.dropbox.com/s/6omxtx27sqbbe ... d.zip?dl=0
So, for this run that I will log, I first bin the image at 50%. Not sure if it is the recommended thing, but mainly I want to avoid memory usage go out of hand (I already reported what looks to the developer like a memory leak on 1.4/Mac). I also crop afterwards 99px off the left, 100 off top and 20 off right and down to frame it nicer.
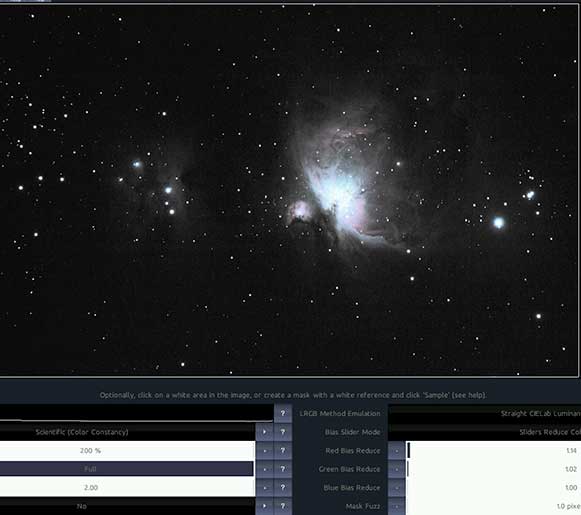
Then I use autoDev for the first time. Ok, I disregard the fact that it brings up all the noise etc, we use it to see what's wrong with our image:
Moving to the Wipe module. I see that there is a bit of vignetting at the edges, less that it would have been if I had not cropped, and also it seems to me there is a gradient as the sky goes a bit darker going upwards. I try using the vignette preset or the gradient preset, I even try after masking out the two nebular regions, but I don't see it being that effective (or in general doing much), e.g. the top left clearly has much less bright noise than the other parts. I don't know if I can do something more or the situation is just too hard for the wipe module? Anyway I keep this result:
Which after an autodev with a ROI set does look like something:
Then going on deconvolution. I try the automask and it fails miserably.
For the developers: since it tells me at the end that my mask does not look like a star mask, i.e. it knows it failed, shouldn't it have automatically given a try with different presets?
But using the auto/mask settings I did manually find something that works:
In retrospect, comparing to the tutorial video, I perhaps should have "grown" the mask to include the area around the center of each star. Right?
In any case, deconvolution seemed to help a bit although unlike the example I had to leave Radius to 1.5px (probably because of more worse data). I kept it and went on to HDR, where the default was obviously not for my image:
I quickly figured out that a larger detail size was needed, over 200 px. So for something more modest:
Wavelet sharpening with the default settings also gave a good result, sharpening some details. So we are going in the color module with this:
But it seems that apart from increasing saturation, removing the color biases gave a more desirable color balance.
And finally I turn tracking off and apply this noise reduction:
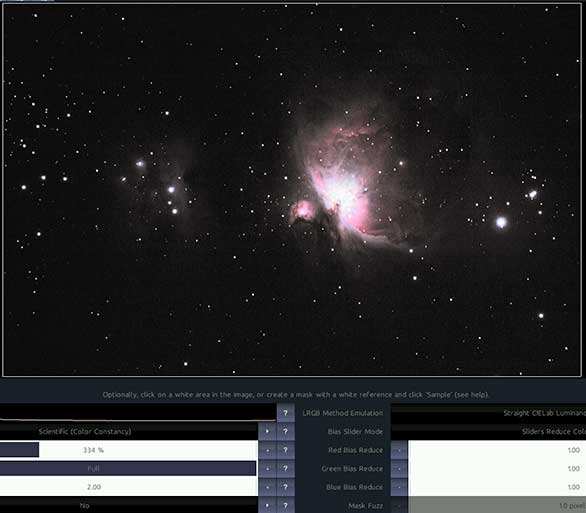
This is the final image in its "full" glory:
To get an idea, here is one run I did under Windows (on my laptop, so I'd prefer to switch to my Mac desktop) with various software (I think for this run I mainly used the free PixInsight LE):
The comparison tells me that I got some good noise reduction out of StarTools and also nice detail on outer clouds, however there are some areas where it is worse. Hence the question is what I could have done better? The main issues I see are:
-The core is a bit too bright hiding some detail. E.g. trapezium is more visible in the alternative processing. Was this a problem with autodev? Select a smaller area when declaring ROI? Or skip autodev and try the develop module?
-The colors are more washed out in StarTools. This might be due to more brightness overall, but I prefer the more reddish rather than pinkish hues.
-The stars seem a bit more unnatural. Perhaps my star mask was not that good while using Decon?
-There is no color in the running man nebula to the left of M42. I tried bumping Saturation to no avail. There is a bluish hue in the alternative processing image, so where did I lose that information?
Also one more suggestion to developers. Like we have before/after switching to see results of settings, could there be a switch between the last tried setting and the current? E.g. switching the display between the previously tried 10% setting and the current 20% setting, instead of just having "before" which really is "before applying this module".
Thanks in advance for any feedback, StarTools seems quite promising but I don't feel like "I'm there yet" using it.
Re: Newbie issues following M8 tutorial
Hi,
I had a look at the data and one of the things that stood out is that it was pre-color balanced and possibly has had other operations done to it.
If you used DSS to stack, please set all 'channel' options for aligment and calibration to 'No'.
Are you positive you gave your stacker the CR2s from your camera directly, and can you confirm not further stretching was performed?
StarTools requires linear data that is as virgin as possible. Without linear, virgin data, StarTools will be unable to keep track of noise propagation and results will be either sub optimal (as you have found out in a number of modules) or impossible to achieve correctly.
I processed your data with StarTools 1.4.300
--- Auto Develop
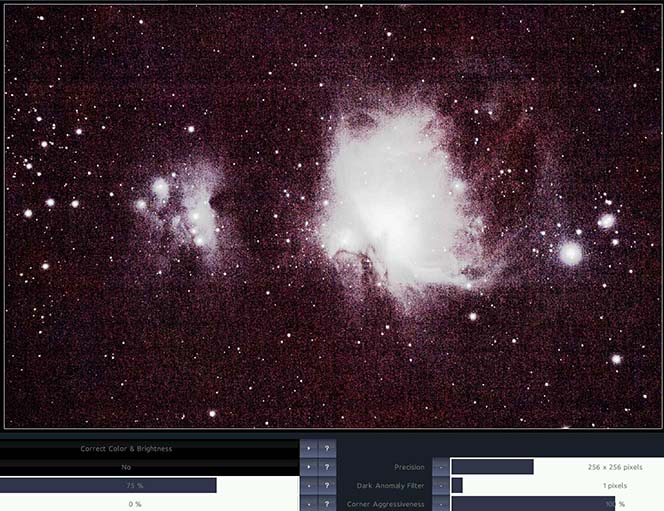
To see what we got. We can see that something has normalized and possibly stretched the data. Even before using AutoDev detail was readily visible, which is fairly rare for linear data (though possible with very bright objects like M42, depending on exposure time). The data also appears to be color calibrated. Some small stacking artifacts are visible, as well as a background bias. The data is fairly noisy and we can see some sort of banding (horizontal).
--- Bin
Binning helps with oversampled data. Most DSLR data is oversampled, applying more resolution than is needed to resolve the detail that made it through the atmosphere and optical train. The excess resolution is converted into a better signal (and we need all we can get!).
Parameter [Scale] set to [(scale/noise reduction 35.38%)/(798.89%)/(+3.00 bits)]
--- Crop
To get rid of stacking artifacts.
Parameter [X1] set to [57 pixels]
Parameter [Y1] set to [85 pixels]
Parameter [X2] set to [1668 pixels (-22)]
Parameter [Y2] set to [1057 pixels (-63)]
--- Wipe
With noisy data and especially data that has not been calibrated by flats and/or dark frames, dark anomalies (e.g. dead pixels or localized aberrations on the sensor) can cause Wipe to lose track of the real interstellar background. When this happens, Wipe will lock on to the dark anomaly as the "real" background since its job is to find the darkest pixels it can find. Bumping up the dark anomaly filter will make sure that Wipe won't see small dark anomalies. Bigger dark anomalies will need to be masked it.
Parameter [Dark Anomaly Filter] set to [7 pixels]
--- Auto Develop
I put an ROI over M42 (click & drag) and set Parameter [Ignore Fine Detail <] to [4.3 pixels] in order to have AutoDev optimize the global stretch less for fine detail (in our case the copious amounts of noise).
--- Deconvolution
As you noticed, decon is unable to make a good star mask of its own. This is usually the case when the data is not linear or has otherwise been tampered with. You managed to create a star mask (which indeed, you could have grown a little to cover all of the biggest stars), but yo may have forgotten to 'invert' the mask (decon needs 'gaps' where the stars are). I did something similar and ended up with a usable star mask. Unfortunately due to the data (seemingly) tampered with, the result wasn't as big of an improvement as I think it could have been.
Parameter [Radius] set to [1.3 pixels]
--- Wavelet Sharpen
Using same mask (so we don't enhance the stars, just the detail)
Parameter [Amount] set to [211 %]
Parameter [Small Detail Bias] set to [94 %]
--- Color
Despite the pre-color calibration, StarTools comes up with a good color balance - no further tweaks needed (though I was tempted to pull back on green a little), except for saturation. Giveaways we're on to something good are the decent distribution of star temperatures and the emissions of Ha (red), Hb (cyan) and mixture (purplish/pink) thereof. The running man (mostly reflection nebula) is a nice blue and the red star below M43 is the deepest red in the image (could have been a bit deeper though).
Parameter [Dark Saturation] set to [2.80]
Parameter [Saturation Amount] set to [383 %]
--- Life
I Used the Life module's Isolate preset (with a full mask set) to push back the noise and Isolate the DSOs from the background.
--- Wavelet De-Noise
Finally, I switched off Tracking and applied noise reduction (these settings are applicable for 1.4.300).
Parameter [Grain Size] set to [20.2 pixels]
Parameter [Read Noise Compensation] set to [10.72 %]
Parameter [Smoothness] set to [83 %]
And this is the result;
Hope this helps!
Ivo Jager
StarTools creator and astronomy enthusiast
Re: Newbie issues following M8 tutorial
Thanks for the reply. I learned a couple of useful things. And the running man came out nicely for you - I don't know at what point exactly I "lost" it.
I don't think there was any color processing, but to be sure I re-ran DSS (and picked 7 instead of 12 1-min. exposures like before dropping the least good ones in case that helped) and did have dark frames (36 actually at the right temperature) as well as 9 flat frames (without those there is too much vignetting - although they did not get rid of an anomaly on the top center - it is dust/reflection that did not come out when I shot flat frames at the end of the session).
So this is the re-stacked https://www.dropbox.com/s/7f8nuh2tkanve ... 2.zip?dl=0 which still has a lot of noise (perhaps I should avoid ISO 1600?).
A quick question - is 16bit FITS enough, or should we save 32bit to use with StarTools?
If it is helpful, here is a sample RAW file from this set: https://www.dropbox.com/s/4t1ad48xe8st2 ... 0.CR2?dl=0
Might I be doing something wrong? What is strange to me is why the RAW shows up with nice color when I open it in photoshop while the stacked image seems to show much less color.
Lastly, sometimes the OS X version crashes when clicking the "Open" button. It does not seem to stop crashing until I delete the /tmp/.trk files (which are usually zero size). Do you perhaps want me to email the debug info from that?
Re: Newbie issues following M8 tutorial
I had a look at the newly stacked data, but something is still not quite right. Some sort of clor calibration is still applied. Can you confirm that in DSS, 'Per Channel Color Calibration' and 'RGB Channels Calibration' are set to 'no'?ecuador wrote: I don't think there was any color processing, but to be sure I re-ran DSS (and picked 7 instead of 12 1-min. exposures like before dropping the least good ones in case that helped) and did have dark frames (36 actually at the right temperature) as well as 9 flat frames (without those there is too much vignetting - although they did not get rid of an anomaly on the top center - it is dust/reflection that did not come out when I shot flat frames at the end of the session).
So this is the re-stacked https://www.dropbox.com/s/7f8nuh2tkanve ... 2.zip?dl=0 which still has a lot of noise (perhaps I should avoid ISO 1600?).
A quick question - is 16bit FITS enough, or should we save 32bit to use with StarTools?
If it is helpful, here is a sample RAW file from this set: https://www.dropbox.com/s/4t1ad48xe8st2 ... 0.CR2?dl=0
Might I be doing something wrong? What is strange to me is why the RAW shows up with nice color when I open it in photoshop while the stacked image seems to show much less color.
Lastly, sometimes the OS X version crashes when clicking the "Open" button. It does not seem to stop crashing until I delete the /tmp/.trk files (which are usually zero size). Do you perhaps want me to email the debug info from that?
This is what you'd be after;
Note that the above was color balanced (since DSS doesn't allow you to turn that off for some odd reason)
Opening a CR2 in something like photoshop will cause Photoshop to 'digitally develop' the RAW, making it look like a 'proper' picture. This is great for single-shot terrestrial images, but applies all sorts of stuff (color balancing, stretching, noise reduction, sharpening, and possibly more) that will impede getting the most from stacking multiple images and further prost processing.
ISO 1600 is typically fine, and on many modern DSLRs, it is also typically the 'sweet spot'. It's a complex story about 'gain', read noise and downstream electronics that can introduce noise. At a certain ISO setting, your camera will simply starts multiplying the amount of photons it caught to 'emulate' sensitivity. That also multiplies noise, so it's not very useful as higher ISOs tend to blow out stars quicker, so you don't want to go higher than you need to. At the same time, you don't want to go too low either as you don't want to risk the camera 'throwing away' photon counts or losing photon counts in the D/A conversion process (which introduces small bits of noise again). Very long story short, stick with ISO 1600...
The MacOSX crash has been reported before, but I'm having a hell of a time reproducing it. Interesting that deleting the the .trk files seems to help? Does this always help or just sometimes. Thanks for reporting this.
Ivo Jager
StarTools creator and astronomy enthusiast
Re: Newbie issues following M8 tutorial
It seems that "Per Channel Color Calibration" was the default (and I had not even realized it is a setting, no radio buttons), however setting to "No" background calibration does not give me a different color balance, just a small shift in the histogram: https://www.dropbox.com/s/towjaxf5dlrmk ... 3.zip?dl=0 (you did not comment about whether a 16bit integer FITS is enough)
Do you think that DSS is not doing a correct job here? Note I am using "average" stacking, I imagine that is OK? I noted that the instructions say that at least Kappa-Sigma can't be used with no background calibration so you wouldn't recommend that.
Any alternative to DSS I should try out?
As for the crashing. I cannot get back into the situation where I could not click open without crashing. I tried different 1.4 builds, always the same thing, until I deleted the .trk. So I surmise that solved it. But of course I can't be sure. However, trying to reproduce it I have managed to find a way to crash StarTools. Click to Open a big file and right-click quit while it is opening. Then open ST again and click Open once more. Crash with stack trace:
However the next time I open the program it works without having to delete .trk, so it is a different crash as can be seen from the stack trace of the issue I had previously (the one which could not be fixed just by relaunching the app):
Edit: Oh, and another problem with the OS X version: I click Save and there is a very simple dialogue that does not offer you options of file type. I type something like final.tif and I get an error message "Unsupported file type" StarTools saves 16 bit TIFF or JPEG. I don't see how I can save in the OS X version.
Do you think that DSS is not doing a correct job here? Note I am using "average" stacking, I imagine that is OK? I noted that the instructions say that at least Kappa-Sigma can't be used with no background calibration so you wouldn't recommend that.
Any alternative to DSS I should try out?
As for the crashing. I cannot get back into the situation where I could not click open without crashing. I tried different 1.4 builds, always the same thing, until I deleted the .trk. So I surmise that solved it. But of course I can't be sure. However, trying to reproduce it I have managed to find a way to crash StarTools. Click to Open a big file and right-click quit while it is opening. Then open ST again and click Open once more. Crash with stack trace:
Code: Select all
Thread 2 Crashed:
0 libsystem_kernel.dylib 0x00007fff8c5cc212 __pthread_kill + 10
1 libsystem_c.dylib 0x00007fff81fc8b24 pthread_kill + 90
2 libsystem_c.dylib 0x00007fff8200cf61 abort + 143
3 libc++abi.dylib 0x00007fff887259eb abort_message + 257
4 libc++abi.dylib 0x00007fff8872339a default_terminate() + 28
5 libobjc.A.dylib 0x00007fff85def873 _objc_terminate() + 91
6 libc++abi.dylib 0x00007fff887233c9 safe_handler_caller(void (*)()) + 8
7 libc++abi.dylib 0x00007fff88723424 std::terminate() + 16
8 libc++abi.dylib 0x00007fff8872458b __cxa_throw + 111
9 libobjc.A.dylib 0x00007fff85def50c objc_exception_throw + 327
10 com.apple.CoreFoundation 0x00007fff8e999f49 -[NSException raise] + 9
11 com.apple.AppKit 0x00007fff83b74ddf -[NSView addSubview:] + 1279
12 com.apple.AppKit 0x00007fff83ab15aa -[NSBox setContentView:] + 81
13 com.apple.AppKit 0x00007fff83ab0b60 -[NSSavePanel(NSSavePanelLayout) _layoutViewsVerticallyAndResizeWindowToLastExpandedSize:accessoryViewHeight:] + 4370
14 com.apple.AppKit 0x00007fff83aaca0b -[NSSavePanel _initPanelCommon] + 484
15 com.apple.AppKit 0x00007fff83aa7410 -[NSSavePanel initWithContentRect:styleMask:backing:defer:] + 334
16 com.apple.AppKit 0x00007fff83aa5177 +[NSSavePanel _crunchyRawUnbonedPanel] + 187
17 com.SiliconFields.StarTools 0x00000001000f7597 0x100000000 + 1013143
18 com.SiliconFields.StarTools 0x00000001000f6bdd 0x100000000 + 1010653
19 com.SiliconFields.StarTools 0x00000001000f6c4e 0x100000000 + 1010766
20 com.SiliconFields.StarTools 0x00000001000f54c9 0x100000000 + 1004745
21 com.SiliconFields.StarTools 0x00000001000f5695 0x100000000 + 1005205
22 com.SiliconFields.StarTools 0x0000000100085a9d 0x100000000 + 547485
23 com.SiliconFields.StarTools 0x0000000100085c69 0x100000000 + 547945
24 com.SiliconFields.StarTools 0x000000010008689f 0x100000000 + 551071
25 com.SiliconFields.StarTools 0x000000010008089a 0x100000000 + 526490
26 com.SiliconFields.StarTools 0x000000010005e051 0x100000000 + 385105
27 com.SiliconFields.StarTools 0x000000010004e1b3 0x100000000 + 319923
28 com.SiliconFields.StarTools 0x000000010004e599 0x100000000 + 320921
29 com.SiliconFields.StarTools 0x0000000100044a78 0x100000000 + 281208
30 com.SiliconFields.StarTools 0x00000001000f743c 0x100000000 + 1012796
31 libsystem_c.dylib 0x00007fff81fc7772 _pthread_start + 327
32 libsystem_c.dylib 0x00007fff81fb41a1 thread_start + 13
Code: Select all
Thread 2 Crashed:
0 libsystem_kernel.dylib 0x00007fff8c5cc212 __pthread_kill + 10
1 libsystem_c.dylib 0x00007fff81fc8b24 pthread_kill + 90
2 libsystem_c.dylib 0x00007fff8200cf61 abort + 143
3 libc++abi.dylib 0x00007fff887259eb abort_message + 257
4 libc++abi.dylib 0x00007fff887233a8 default_terminate() + 42
5 libc++.1.dylib 0x00007fff8a8858fe std::terminate() + 20
6 com.apple.FinderKit 0x00007fff8d6fb95c StRestoreExpandedState::~StRestoreExpandedState() + 172
7 com.apple.FinderKit 0x00007fff8d6f84b4 -[FI_TSidebarViewController(Model) repopulateReadZoneOrderFromPrefs:] + 122
8 com.apple.FinderKit 0x00007fff8d6efc13 -[FIFinderViewGutsController _configureSidebarForMediaBrowserTypes] + 240
9 com.apple.AppKit 0x00007fff83ab53d1 -[NSSavePanel _loadPreviousModeAndLayout] + 60
10 com.apple.AppKit 0x00007fff84036c5a -[NSSavePanel runModal] + 66
11 com.SiliconFields.StarTools 0x00000001000f75e1 0x100000000 + 1013217
12 com.SiliconFields.StarTools 0x00000001000f6bdd 0x100000000 + 1010653
13 com.SiliconFields.StarTools 0x00000001000f6c4e 0x100000000 + 1010766
14 com.SiliconFields.StarTools 0x00000001000f54c9 0x100000000 + 1004745
15 com.SiliconFields.StarTools 0x00000001000f5695 0x100000000 + 1005205
16 com.SiliconFields.StarTools 0x0000000100085a9d 0x100000000 + 547485
17 com.SiliconFields.StarTools 0x0000000100085c69 0x100000000 + 547945
18 com.SiliconFields.StarTools 0x000000010008689f 0x100000000 + 551071
19 com.SiliconFields.StarTools 0x000000010008089a 0x100000000 + 526490
20 com.SiliconFields.StarTools 0x000000010005e051 0x100000000 + 385105
21 com.SiliconFields.StarTools 0x000000010004e1b3 0x100000000 + 319923
22 com.SiliconFields.StarTools 0x000000010004e599 0x100000000 + 320921
23 com.SiliconFields.StarTools 0x0000000100044a78 0x100000000 + 281208
24 com.SiliconFields.StarTools 0x00000001000f743c 0x100000000 + 1012796
25 libsystem_c.dylib 0x00007fff81fc7772 _pthread_start + 327
26 libsystem_c.dylib 0x00007fff81fb41a1 thread_start + 13
Edit: Oh, and another problem with the OS X version: I click Save and there is a very simple dialogue that does not offer you options of file type. I type something like final.tif and I get an error message "Unsupported file type" StarTools saves 16 bit TIFF or JPEG. I don't see how I can save in the OS X version.
Re: Newbie issues following M8 tutorial
Sorry, I completely missed your latest post!
32-bits integer FITS is preferred to be on the safe side, but 16-bit may be enough depending on your stacking algorithm and number of subs.
Thanks for the crash reports. I still have some work to do (probably a file dialog rewrite for MacOSX).
This alpha has completely rewritten file dialog code, so there was bound to be some problems... Sorry about that!
Hmmm... Something is stil not right - I don't see much of a difference with the last data. What version of DSS are you using? Can you try using the Autosave.tiff file?ecuador wrote:It seems that "Per Channel Color Calibration" was the default (and I had not even realized it is a setting, no radio buttons), however setting to "No" background calibration does not give me a different color balance, just a small shift in the histogram: https://www.dropbox.com/s/towjaxf5dlrmk ... 3.zip?dl=0 (you did not comment about whether a 16bit integer FITS is enough)
32-bits integer FITS is preferred to be on the safe side, but 16-bit may be enough depending on your stacking algorithm and number of subs.
DSS unfortunately has a tendency to meddle with the data in a way that cannot be turned off (for example, color balancing cannot be turned off). This has some impact on noise unfortunately. PixInsight contains one of the best stackers that I know of and CCDstack isn't far behind. There is also Nebulosity, MaximDL, Images Plus or Theli (free). Some may still meddle with the data like DSS though. It's not a huge deal, but it can make a difference.Do you think that DSS is not doing a correct job here? Note I am using "average" stacking, I imagine that is OK? I noted that the instructions say that at least Kappa-Sigma can't be used with no background calibration so you wouldn't recommend that.
Any alternative to DSS I should try out?
Thanks for the crash reports. I still have some work to do (probably a file dialog rewrite for MacOSX).
Does saving with a .tiff extension work?Edit: Oh, and another problem with the OS X version: I click Save and there is a very simple dialogue that does not offer you options of file type. I type something like final.tif and I get an error message "Unsupported file type" StarTools saves 16 bit TIFF or JPEG. I don't see how I can save in the OS X version.
This alpha has completely rewritten file dialog code, so there was bound to be some problems... Sorry about that!
Ivo Jager
StarTools creator and astronomy enthusiast
Re: Newbie issues following M8 tutorial
I am using DSS 3.3.4, since 3.3.2 could not open my RAWs. I can give you the autosave to see if it is any better: https://www.dropbox.com/s/efngxlw2b67p0 ... 4.tif?dl=0
How does it look? I could even provide you with the full data set (1GB though) if you suspect something else going wrong.
Also, I can confirm that I can find no way to save using the OS X version. .tiff gives me the same error.
Speaking about OS X, is perhaps drag & drop to the dock icon a quick addition?
Re: Newbie issues following M8 tutorial
Bingo! That looks *a lot* better!ecuador wrote:I am using DSS 3.3.4, since 3.3.2 could not open my RAWs. I can give you the autosave to see if it is any better: https://www.dropbox.com/s/efngxlw2b67p0 ... 4.tif?dl=0
How does it look? I could even provide you with the full data set (1GB though) if you suspect something else going wrong.
Ok, the issue the is that DSS is somehow saving changes to the file when you save it through the interface. There may be an option to turn that off somewhere, or it could be a bug (I'm a bit hazy on that...) The TIFF file was still saved compressed (which ST doesn't support, and which you should also be able to turn off in DSS), so I converted it with ImageMagick to an uncompressed file.
Eek!Also, I can confirm that I can find no way to save using the OS X version. .tiff gives me the same error.
Speaking about OS X, is perhaps drag & drop to the dock icon a quick addition?
Can you try saving in another location (e.g. Desktop) - we've had a bug before where certain characters in the path name stuffed things up...
Possible (re: drag & drop), though more changes are planned first.
Quick reprocess of this data set (you could 'rescue' the core with teh HDR module);
You'll notice the core is now much better visible. Colours also show features that are interesting (the greenish OIII emissions in the core are prevalent - very nice!)
--- Auto Develop
--- Bin
Parameter [Scale] set to [(scale/noise reduction 50.00%)/(400.00%)/(+2.00 bits)]
--- Crop
Parameter [X1] set to [344 pixels]
Parameter [Y1] set to [214 pixels]
Parameter [X2] set to [2474 pixels (-127)]
Parameter [Y2] set to [1658 pixels (-74)]
--- Wipe
Masked out Running Man and M42
Parameter [Dark Anomaly Filter] set to [6 pixels]
--- Auto Develop
ROI over M42
Parameter [Ignore Fine Detail <] set to [3.2 pixels]
Parameter [Outside ROI Influence] set to [7 %]
--- Deconvolution
Auot Mask
Parameter [Radius] set to [2.2 pixels]
--- Wavelet Sharpen
Parameter [Scale 1] set to [20 %]
Parameter [Amount] set to [194 %]
Parameter [Small Detail Bias] set to [98 %]
--- Color
Parameter [Dark Saturation] set to [4.10]
Parameter [Saturation Amount] set to [132 %]
--- Band
Parameter [Orientation] set to [Vertical]
--- Band
Parameter [Orientation] set to [Horizontal]
--- Wavelet De-Noise
Parameter [Scale 5] set to [49 %]
Parameter [Color Detail Loss] set to [17 %]
Parameter [Brightness Detail Loss] set to [13 %]
Parameter [Grain Size] set to [18.6 pixels]
Parameter [Smoothness] set to [84 %]
Ivo Jager
StarTools creator and astronomy enthusiast
Re: Newbie issues following M8 tutorial
Nope, I can't save anywhere...
The problem is only with 1.4. Version 1.3 works properly. Even if I don't enter an extension, 1.3 asks me whether I would like to save to TIFF instead. 1.4 gives only the unhelpful "unsupported" message.
Re: Newbie issues following M8 tutorial
Hmmm... the plot thickens... Works just fine here. I think I'm going to have to do something completely different...ecuador wrote:Nope, I can't save anywhere...
The problem is only with 1.4. Version 1.3 works properly. Even if I don't enter an extension, 1.3 asks me whether I would like to save to TIFF instead. 1.4 gives only the unhelpful "unsupported" message.
Ivo Jager
StarTools creator and astronomy enthusiast